


[Developing in NXC using XCode]
Date: Jan 2012
 There are a number of tools and IDEs you can use to create programs for the NXT Mindstorms. I would argue that the best tool should support most operating systems and involve C or a similar language (there is a limited memory on the brick so good memory management becomes an issue). While Robot-C is probably the best choice in terms of integration with the brick, it is a commercial tool and it only work on Windows so far. After comparing a number of options, I chose NXC as a pretty good alternative to Robot-C. It supports a lot of things like sensor and motor management, playing of sounds, basic 2D and 3D graphics, etc. Most importantly, you can compile your programs from the command line or from XCode. This tutorial assumes knowledge of XCode 4 and of C. The NXC programming guide is a good reference.
Please read the tutorial Setting up NXC Development on a Mac if you are not sure about this step.


There are a number of tools and IDEs you can use to create programs for the NXT Mindstorms. I would argue that the best tool should support most operating systems and involve C or a similar language (there is a limited memory on the brick so good memory management becomes an issue). While Robot-C is probably the best choice in terms of integration with the brick, it is a commercial tool and it only work on Windows so far. After comparing a number of options, I chose NXC as a pretty good alternative to Robot-C. It supports a lot of things like sensor and motor management, playing of sounds, basic 2D and 3D graphics, etc. Most importantly, you can compile your programs from the command line or from XCode. This tutorial assumes knowledge of XCode 4 and of C. The NXC programming guide is a good reference.
Setting up an XCode project
This blog by Mark C summarises the main points of NXC XCode development and provides a downloadable Hello World program. Rather than repeating what was said before, I would like to give a step-by-step guide to creating a project from scratch. The reason for that is that even if you download somebody else's HelloWorld program, XCode does not allow you to easily change the project name so it is always easier to create a new project.1. Download
The first step is to download the latest nxc compiler and nxt firmware. Put the compiler on your disk, e.g. to the /Developer folder. Also, you might find the NeXT Tools useful.Please read the tutorial Setting up NXC Development on a Mac if you are not sure about this step.
2. Create project
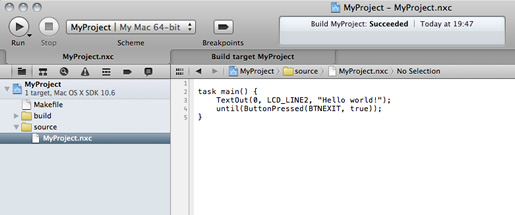
In XCode, choose 'Create new project' and select 'External Build System' under Mac OS X -> Other. This will take care of some basic build and target setup. In this example, we name our project 'MyProject'.


Comments
[12/03/2021]
[19/12/2014]
[19/12/2014]
[13/01/2013]
[13/01/2013]
{Please enable JavaScript in order to post comments}