


[How to compile code for e-puck robots on your computer]
Date: Mar 2017
 Compiling code natively on e-puck robots is a tedious process. First, you have to get your code onto the robot and then use the slow robot to compile. This usually takes a number of times longer than compiling code on your own computer. Cross-compiling is the obvious answer, where you write code on your computer, use a cross-compiler to build a program and then copy the program onto the robot. However, the support for cross-compilation for e-puck is currently poor and cross-compiling in general is difficult at best.
Luckily, there is a third option, provided that you have the UWE Linux extension board installed on your robot: compiling code on a virtualised robot system on your computer, then sending the program onto the robot. This has the advantage of allowing you compile for libraries that are definitely available on the robot, while avoiding all cross-compilation issues. At the same time, you can harness the speed of your computer and keep your code properly organised in your favourite IDE and in a git repository.
Before I go into more detail, I would like to thank Simon Jones from the Bristol Robotics Laboratory for showing me how to make this compilation process work.
Ok, so here is what you will need:
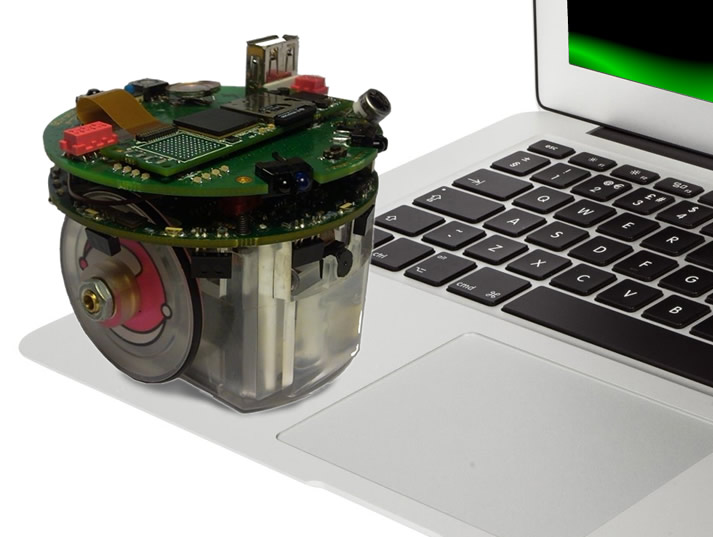
- An e-puck robot with the open-hardware UWE Linux extension board
- A computer running Linux (I use Ubuntu 16.0.4 at the time of writing this). If, like me, you have a Mac, here is a great tutorial on how you can dual boot Linux on it.
- SD card adapter that works with your computer
- Code for the e-puck robot that is compilable. Ideally, you have already tried compiling your code on the e-puck itself and made sure that it works.
Here is how you can start developing your e-puck code:
Creating a virtual image
 The first step is to take out the SD card from the robot and use the SD card adapter that allows you to read the card on your computer. Then, open Terminal and look for the device identifier by typing
lsblk
Have a look through the output of the command, which should look like the example below. Search for a device that has the correct or similar size as the SD card. The SD card in this example has size of 16GB, so our device identifier is 'sdc':NAME MAJ:MIN RM SIZE RO TYPE MOUNTPOINT
sda 8:0 0 64G 0 disk
|--sda1 8:1 0 56G 0 part /
|--sda2 8:2 0 1K 0 part
|--sda5 8:5 0 8G 0 part [SWAP]
sdc 8:32 1 15G 0 disk
|--sdc1 8:33 1 128.5M 0 part /media/user/9565-C3C9
sr0 11:0 1 1024M 0 rom
Next, run the following in order to copy the device into your machine, for example into the EPUCKimage folder in your home directory:cd ~
mkdir EPUCKimage
cd EPUCKimage
sudo dd if=/dev/[DEVICE] of=epuck.img bs=1M
Replace '[DEVICE]' with the name of your SD card device, for example use '/dev/sdc'. Be very careful! If you put the wrong device name, you could overwrite your hard drive!
Mounting and working with the image
Now that the image is on your computer, you can mount it and act as root of the device in the terminal window that mounts it. It is a good idea to create a bash script that you can always simply execute from your terminal. Create a new bash file anywhere on your computer, and name it e.g. 'mountImage.sh'. The contents of the file should be:sudo kpartx -av ~/EPUCKimage/epuck.img
sleep 3
cd ~/EPUCKimage
mkdir mnt
sudo mount /dev/mapper/loop0p2 ~/EPUCKimage/mnt
sudo chmod -R 777 ~/EPUCKimage/mnt/root/
for m in `echo 'sys dev proc etc/resolv.conf'`; do sudo mount /$m ~/EPUCKimage/mnt/$m -o bind; done
sudo cp /usr/bin/qemu-arm-static ~/EPUCKimage/mnt/usr/bin
sudo chroot ~/EPUCKimage/mnt
Similarly, an 'unmountImage.sh' should look like:sudo umount mnt/{sys,dev,proc,etc/resolv.conf} -l
sudo umount mnt
sudo kpartx -d ~/EPUCKimage/epuck.img
When you execute mountImage.sh, the image will be mounted and you will act as root. It is equivalent to SSH-ing into the robot as root. In order to unmount the image, you can execute 'unmount.sh' from a different terminal window, where you act as your computer user. Remember, the e-puck root has no access outside of the mounted image!
The next step is to copy your project code into the mounted image. You can do so either from another terminal window, or by using the file manager. The file system of the mounted image is normally accessible to your computer user via its path, e.g. ~/EPUCKimage/mnt/. Any contents will be saved when you unmount the image and mount it again, which makes it possible to use the image as a normal working directory.
When your code is copied into the image, return back to the Terminal window in which you mounted. Remember, this is the only terminal window where you act as if SSH-d into the robot. When you compile your code here, it will be the same as compiling on the robot itself, avoiding any cross-compilation issues. Send the compiled program into the robot (e.g. via scp or rsync) and it should work straight away.
Managing your project
Thanks to the fact that the mounted image is accessible to your computer user just like any other folder, it is possible to use your favourite development IDE, as well as git, to work with your code.
You can setup your IDE by simply specifying the full path to the code on the e-puck image, e.g. ~/EPUCKimage/mnt/root/my_project . Remember though that this route is only valid after you have mounted the image!
Similarly, you can use git in your project as well, which wouldn't be possible if you were compiling on the robot itself. The trick is to use a different terminal window to execute git commands, where you act as your computer user, who has full access to git.
A small annoyance to remember is that when you unmount and mount the image, all project files look like new files to git. Therefore, it is always a good idea to:
- Commit and, just in case, push, everything to git before you unmount
- Navigate to your project folder right away after you mount and use git checkout . to tell git to rewind all files to the last commit. Do this before you make any new changes to your code, so that you don't loose any work
And that's it! Hopefully, it will now be much easier for you now to create code for your e-puck and to properly manage your coding project at the same time.


Comments
[01/04/2022]
[04/04/2017]
[03/04/2017]
{Please enable JavaScript in order to post comments}